
February, 2005
Everybody has things that they worry about. When I am driving the Stude I worry about the weak brakes, sloppy steering, lack of seatbelts, and the clueless looks I get from other drivers when I use hand signals. After seeing countless people think I am pointing when I signal a left turn it occurred to me that getting rear-ended is a real possibility. The brake lights work but like all the lights on the car they are tiny and dim by today’s standards. Click here to see what I am talking about. Brighter brake lights would make me feel better and I can work on them in my warm house. What more can I ask for?
6V bulbs are not really a growth market and are a little hard to find. I really wanted LED taillights but those are 12V only and tend to point the wrong direction. The lamp sockets on my taillights hold the bulbs straight up and down. A standard flashlight-style LED bulb would be pointing right up at the trunk lid.
Halogen bulbs can be had but that seemed too easy. I figured I would make a 6 volt LED lamp myself using the new super-bright LED’s. The first task was to find LED’s. Turns out that they are expensive from electrical supply places in small quantities. I almost gave up when I found a deal on SnapGone for small LED keychain flashlights. These sell in stores for $3 or so but I could buy 10 for 5$. .50 each was less than I could buy just the LED’s for. I bought 30. Should have got 40.
 The LED’s are designed to run at 3V so I decided to wire them up in The LED’s are designed to run at 3V so I decided to wire them up in gangs of two LED’s in series. I disassembled a bunch of flashlights, borrowed a breadboard from work, and dug out a 6V lantern battery as a power supply. gangs of two LED’s in series. I disassembled a bunch of flashlights, borrowed a breadboard from work, and dug out a 6V lantern battery as a power supply. |
 A little experimentation with my existing taillight bulb determined that the taillight filament draws 1/3 the current of the brake light. So I figured I would use roughly 4 LED’s for the taillight and 8 LED’s for the brake light. This is the brake light being tested. Looks really bright! But I was wrong. A little experimentation with my existing taillight bulb determined that the taillight filament draws 1/3 the current of the brake light. So I figured I would use roughly 4 LED’s for the taillight and 8 LED’s for the brake light. This is the brake light being tested. Looks really bright! But I was wrong. |
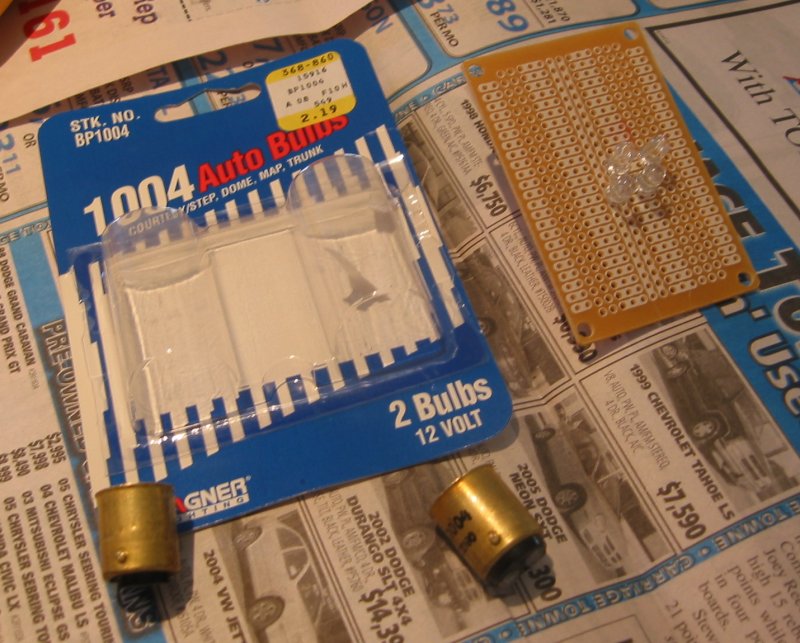 A shopping trip to Radio Shack and the hardware store got two small perforated PC boards and two 12V bulbs with the same sockets as my taillights. The white marks on the perf board show the holes that are connected together on the back. You can see in the picture that I have figured out how to gang my LED’s so that they will be easy to solder in together. I broke the bulbs and carefully cleaned the sockets out to serve as bases for my lamp. My first plan was to solder onto the terminals in the bases to power the lamp but that looked too hard. Instead I decided to run leads directly from the circuit board to the car’s wiring harness connectors. A shopping trip to Radio Shack and the hardware store got two small perforated PC boards and two 12V bulbs with the same sockets as my taillights. The white marks on the perf board show the holes that are connected together on the back. You can see in the picture that I have figured out how to gang my LED’s so that they will be easy to solder in together. I broke the bulbs and carefully cleaned the sockets out to serve as bases for my lamp. My first plan was to solder onto the terminals in the bases to power the lamp but that looked too hard. Instead I decided to run leads directly from the circuit board to the car’s wiring harness connectors. |
 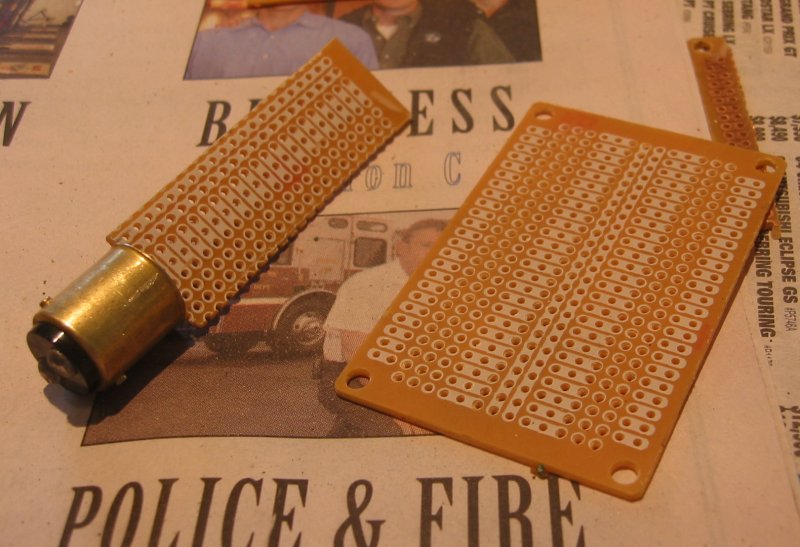 The picture at left shows the taillight from when I replaced the seals. The opening the light shines though is about 11/4″ by 2 1/4″. However a little extra clearance is needed on the sides so the assembly can be rotated into the socket without hitting the frame of the taillight. At right shows how I cut the perf board to fit. Looks pretty good. The picture at left shows the taillight from when I replaced the seals. The opening the light shines though is about 11/4″ by 2 1/4″. However a little extra clearance is needed on the sides so the assembly can be rotated into the socket without hitting the frame of the taillight. At right shows how I cut the perf board to fit. Looks pretty good. |
 Here is the assembled circuit board. The row of holes at the top has two banks of LED’s and is for the taillight. The second row of holes has 4 banks of LED’s for the brake light. All the banks are tied together at the bottom of the circuit board. These will be attached to the lamp base (which gets +6V in this positive ground system). To prevent shorts between the top two rows and the lamp base I cut the traces inside the red circle. Notice I have additional room if I want to add more LED’s later. Here is the assembled circuit board. The row of holes at the top has two banks of LED’s and is for the taillight. The second row of holes has 4 banks of LED’s for the brake light. All the banks are tied together at the bottom of the circuit board. These will be attached to the lamp base (which gets +6V in this positive ground system). To prevent shorts between the top two rows and the lamp base I cut the traces inside the red circle. Notice I have additional room if I want to add more LED’s later. |
 The “finished” product. I just used hot melt glue to secure the board inside the base. A short lead soldered to the inside of the base provides the positive connection. The two leads soldered at the top have bullet connectors to tie into the existing tail and brake light connectors on the car wiring harness. The “finished” product. I just used hot melt glue to secure the board inside the base. A short lead soldered to the inside of the base provides the positive connection. The two leads soldered at the top have bullet connectors to tie into the existing tail and brake light connectors on the car wiring harness. |
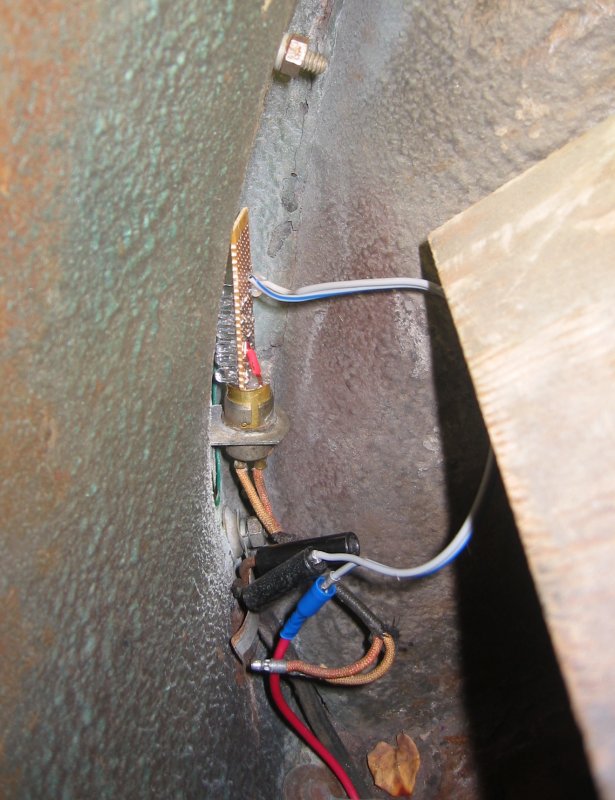 Here is the lamp installed. It works just fine but is DIMMER than the incandescent lamp. ARRRRGGHH! If you just LOOK at the light it is brighter. But once it is behind the lens it is noticeably dimmer. I think the lens is designed to distribute a point source of light at a precise spot (where the bulb filament is located). My LED’s are spread over a larger area and the lens does a crappy job with it. I will have to try more LED’s later but even if that works I will not have enough LED’s to do both sides. Right now I am frustrated with the whole thing so I am going to leave it alone for a while. Not everything works out. Here is the lamp installed. It works just fine but is DIMMER than the incandescent lamp. ARRRRGGHH! If you just LOOK at the light it is brighter. But once it is behind the lens it is noticeably dimmer. I think the lens is designed to distribute a point source of light at a precise spot (where the bulb filament is located). My LED’s are spread over a larger area and the lens does a crappy job with it. I will have to try more LED’s later but even if that works I will not have enough LED’s to do both sides. Right now I am frustrated with the whole thing so I am going to leave it alone for a while. Not everything works out. |
Pingback: CHMSL in the Studebaker | 1941 Studebaker Champion